Making wine combines my passions:
- Hoarding stuff instead of throwing it away or recycling it.
- Recipes that involve a lot of long tedious steps.
- Drinking wine
Let’s start with the things you’ll need:
Wine bottles– Sure you can buy new bottles, but I like to buy the wine bottles that already have wine in them and then soak and goo gone the labels off afterwards. Also, make sure to buy the wine bottles that have corks and not a screw top.
Carboys– Basically really big bottles to hold your wine in. They come in a 6-gallon and 1 gallon. I’d definitely get both. But starting small with one gallon is a good idea!
Food Grade buckets with lid and airlock- This is for the first two weeks of your wine where you’ll need to stir your fruit must at least twice a day. You’ll get to watch it bubble and foam and feel the heat coming off of the reaction of sugars turning into alcohol. It’s so fun!
Airlocks for bucket and carboys– To let the gas out and keep the bacteria away. A latex balloon works in a pinch as well, as long as you don’t have too big of a batch. 
Corks and a corker– no you can’t just boil or sterilize corks that have already been used. (Maybe it’s just me who needs to be told that).
Sterilization– You could use bleach to sterilize things, it just isn’t great for the environment. You can buy B-Brite from a local brew shop but just like bleach, you have to be very careful about making sure to rinse everything out. If just a little gets in the wine it could be bad news! I like Sodium Metabisulphite. You can buy them in the form of campden tablets which makes it easier to control amounts, or buy the much cheaper powder form. You can use it to sterilize your equipment and it’s used in the beginning stages of cleaning the wine as well. It shouldn’t be consumed but does eventually evaporate out of the wine. True hippies don’t like the stuff. But if you notice organic wine from the store, sometimes it will say “no traces of sulphites” This doesn’t necessarily mean they never used any to help clean the wine, it just means it has all evaporated out. I only use it in the beginning of my wine making. A lot of recipes call for sodium metasulphite to be added after each re-racking, but I’ve never found that to be necessary. But we can get into that later!
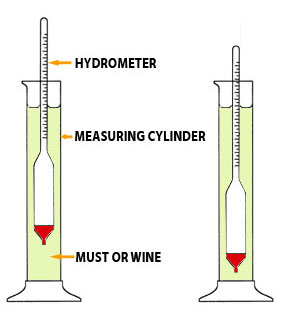
Brix Scale: This is to test sugar content in the beginning so you can later figure out the alcohol content of your wine. You can get a digital scale, or you can be like me and just have a physical one that measures density of the liquid.
Syphoning tube, wine bottle filler, and fruit bag to separate your fruit from the wine when the time comes.
You can also just get a kit that has all this shit in it already! They’re expensive but I’ve had mine for 7 years and have never had to replace anything. You can also not buy any of this stuff and use things you have around the house already. Humans have made wine for thousands of years and they didn’t need any of this shit. As long as you clean everything, use food grade materials, and make sure to re-rack your wine as soon as dead yeast starts to build up in the bottom of your container you should be able to make wine just fine. You should also always use wine yeast. Not that bread yeast wouldn’t work, it will just make it taste weird.
Extras for if you want to be super cool vintner:
Glycerin: For extra body 😉
Wine Yeast: Red Wine Yeast, White Wine Yeast, Champagne Yeast, they’ve got it all! It should be available at your local brewery outlet, if not it’s very easy to order online. And it keeps for a long time too!
Tartaric or Citric Acid: In case your wine needs more acidity
Calcium Carbonate: In case your wine is too acidic
Pectin Enzyme: Often necessary for fruit wines to break down their pectin. Tough fruits like apples, pears, plums, chokecherries and citrus fruits have lots of pectin. Soft fruits like grapes and cherries do not. You have probably heard of pectin before because lots of jam recipes require pectin to give it that extra jelly jiggle. You don’t want that in wine. I like to keep my pectin enzyme sitting beside my pectin in the basement. I like to think they fight at night.
Tannins: Tannins is one of those words that makes you sound instantly smart while you’re drinking wine. Tannins are naturally in the stems, leaves, skins, and seeds of the grape. They naturally kill bacteria and taste bitter as hell. Tannins are the reason you can technically make (and allowed people to make wine for centuries) without sterilizing anything. You won’t need to add tannins to grape wine but sometimes it’s called for in other fruit wine recipes.
Simple Syrup: Getting sugar to dissolve with the least water possible. Basically if your wine sugar content isn’t high enough once you’ve mashed up all your fruit, you’re going to want to add sugar without including a ton of water. Nooo you can’t just dump sugar in your wine. Dissolve that shit in water first. You can also use honey which adds a cool mead vibe to your wine.
The Process
- Pick your grapes– It takes a long time to pick and an even longer time to pick them off from the clusters. A local winery entices people to pick their grapes by offering them lunch and give them a free bottle of wine at the end of the day. Other states use migrant labor. You’ll use yourself and any unlucky friends or boyfriends who are lucky enough to help you out. There will be tons of bugs on your grapes too! In Iowa we have black widow spiders. The only time I have seen one has been on my grapes so wear gloves! Spend the next 5 hours picking them off. Since you will be cleaning them with Sodium Metabisulphite you will not have to worry if you get some contaminates. I’ve even read some books that say keep the bugs! They add flavor. But I still rinse my grapes before I put them in the bucket.
- Squeeze your Grapes– I use my hands for this, I generally don’t have enough grapes to be a big deal for me not to do this by hand. But recently I discovered an aronia berry farm on the outside of town and next year I may be combining everything to make a large batch of wine. I’ve got my eyes on this!
3. Check the Specific Gravity– In order to effectively check your alcohol content you will need to check your Brix, or the density of your juice. The more sugar will mean the more dense it will be and therefore make the most alcohol. For an 11% wine you will need your juice to start out around 1.085. You’ll want to add simple syrup to your juice until it reaches that number. Or you can accept the number your grapes naturally are and calculate from there. In California it is actually illegal to add any sugar to grapes. So clearly there are many who believe added sugar compromises the natural flavor of the wine. I personally like to add honey.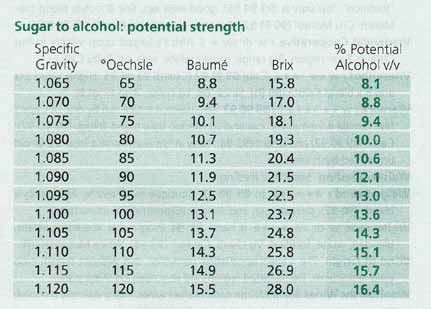
- Sterilize in your bucket– Now that you’ve got all your juice and skins at the right brix, you can throw them in your sterilized food grade bucket with an airlock sealed on top. In the airlock I like to add water with a little sodium metabisulphite, so if a little bubbles into the wine it won’t be the end of the world. Add one Campden Tablet per gallon of juice.
Wait 24 hours for all that intense sulfur smell to go away. I’ve waited up to two days if it’s extra rough because the sulphite can kill the yeast. 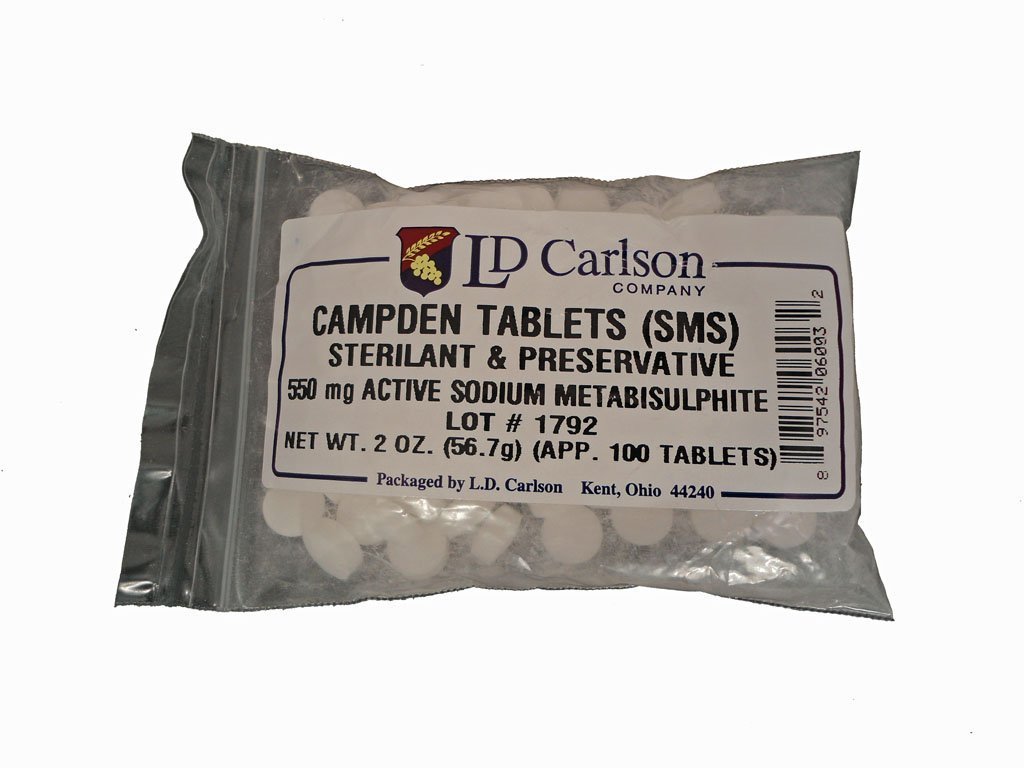
5. Add your yeast! I’ve never used more than a packet even when I’ve had 6 gallons. Those yeast reproduce so quick you don’t need it. Remember you need to order particular yeast for your specific purposes though. I generally let my yeast sit in a a few tablespoons of warm water with a teaspoon of sugar dissolved in it for about 15 minutes before adding to my juice. Then after your yeast expands at the surface poor in the juice and then close and do not touch. You don’t even need to stir your yeast around, just leave it so it can do it’s thing!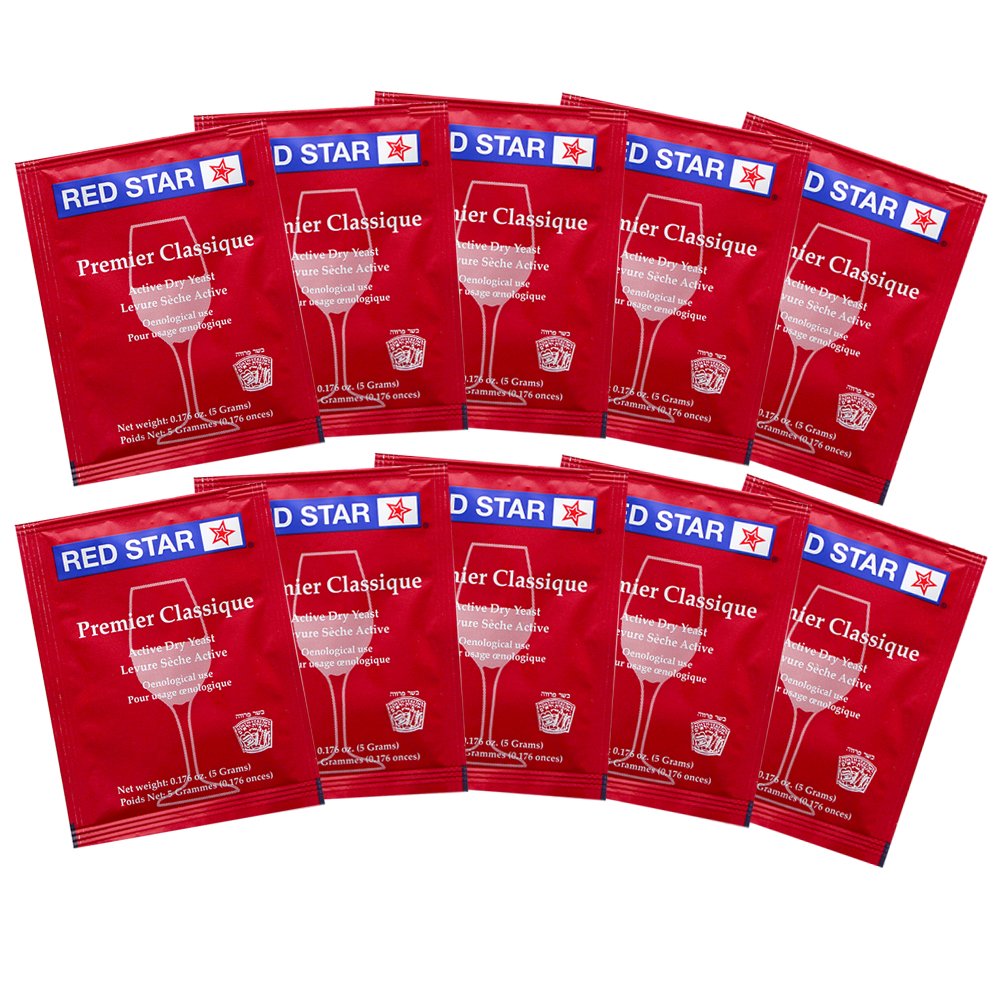
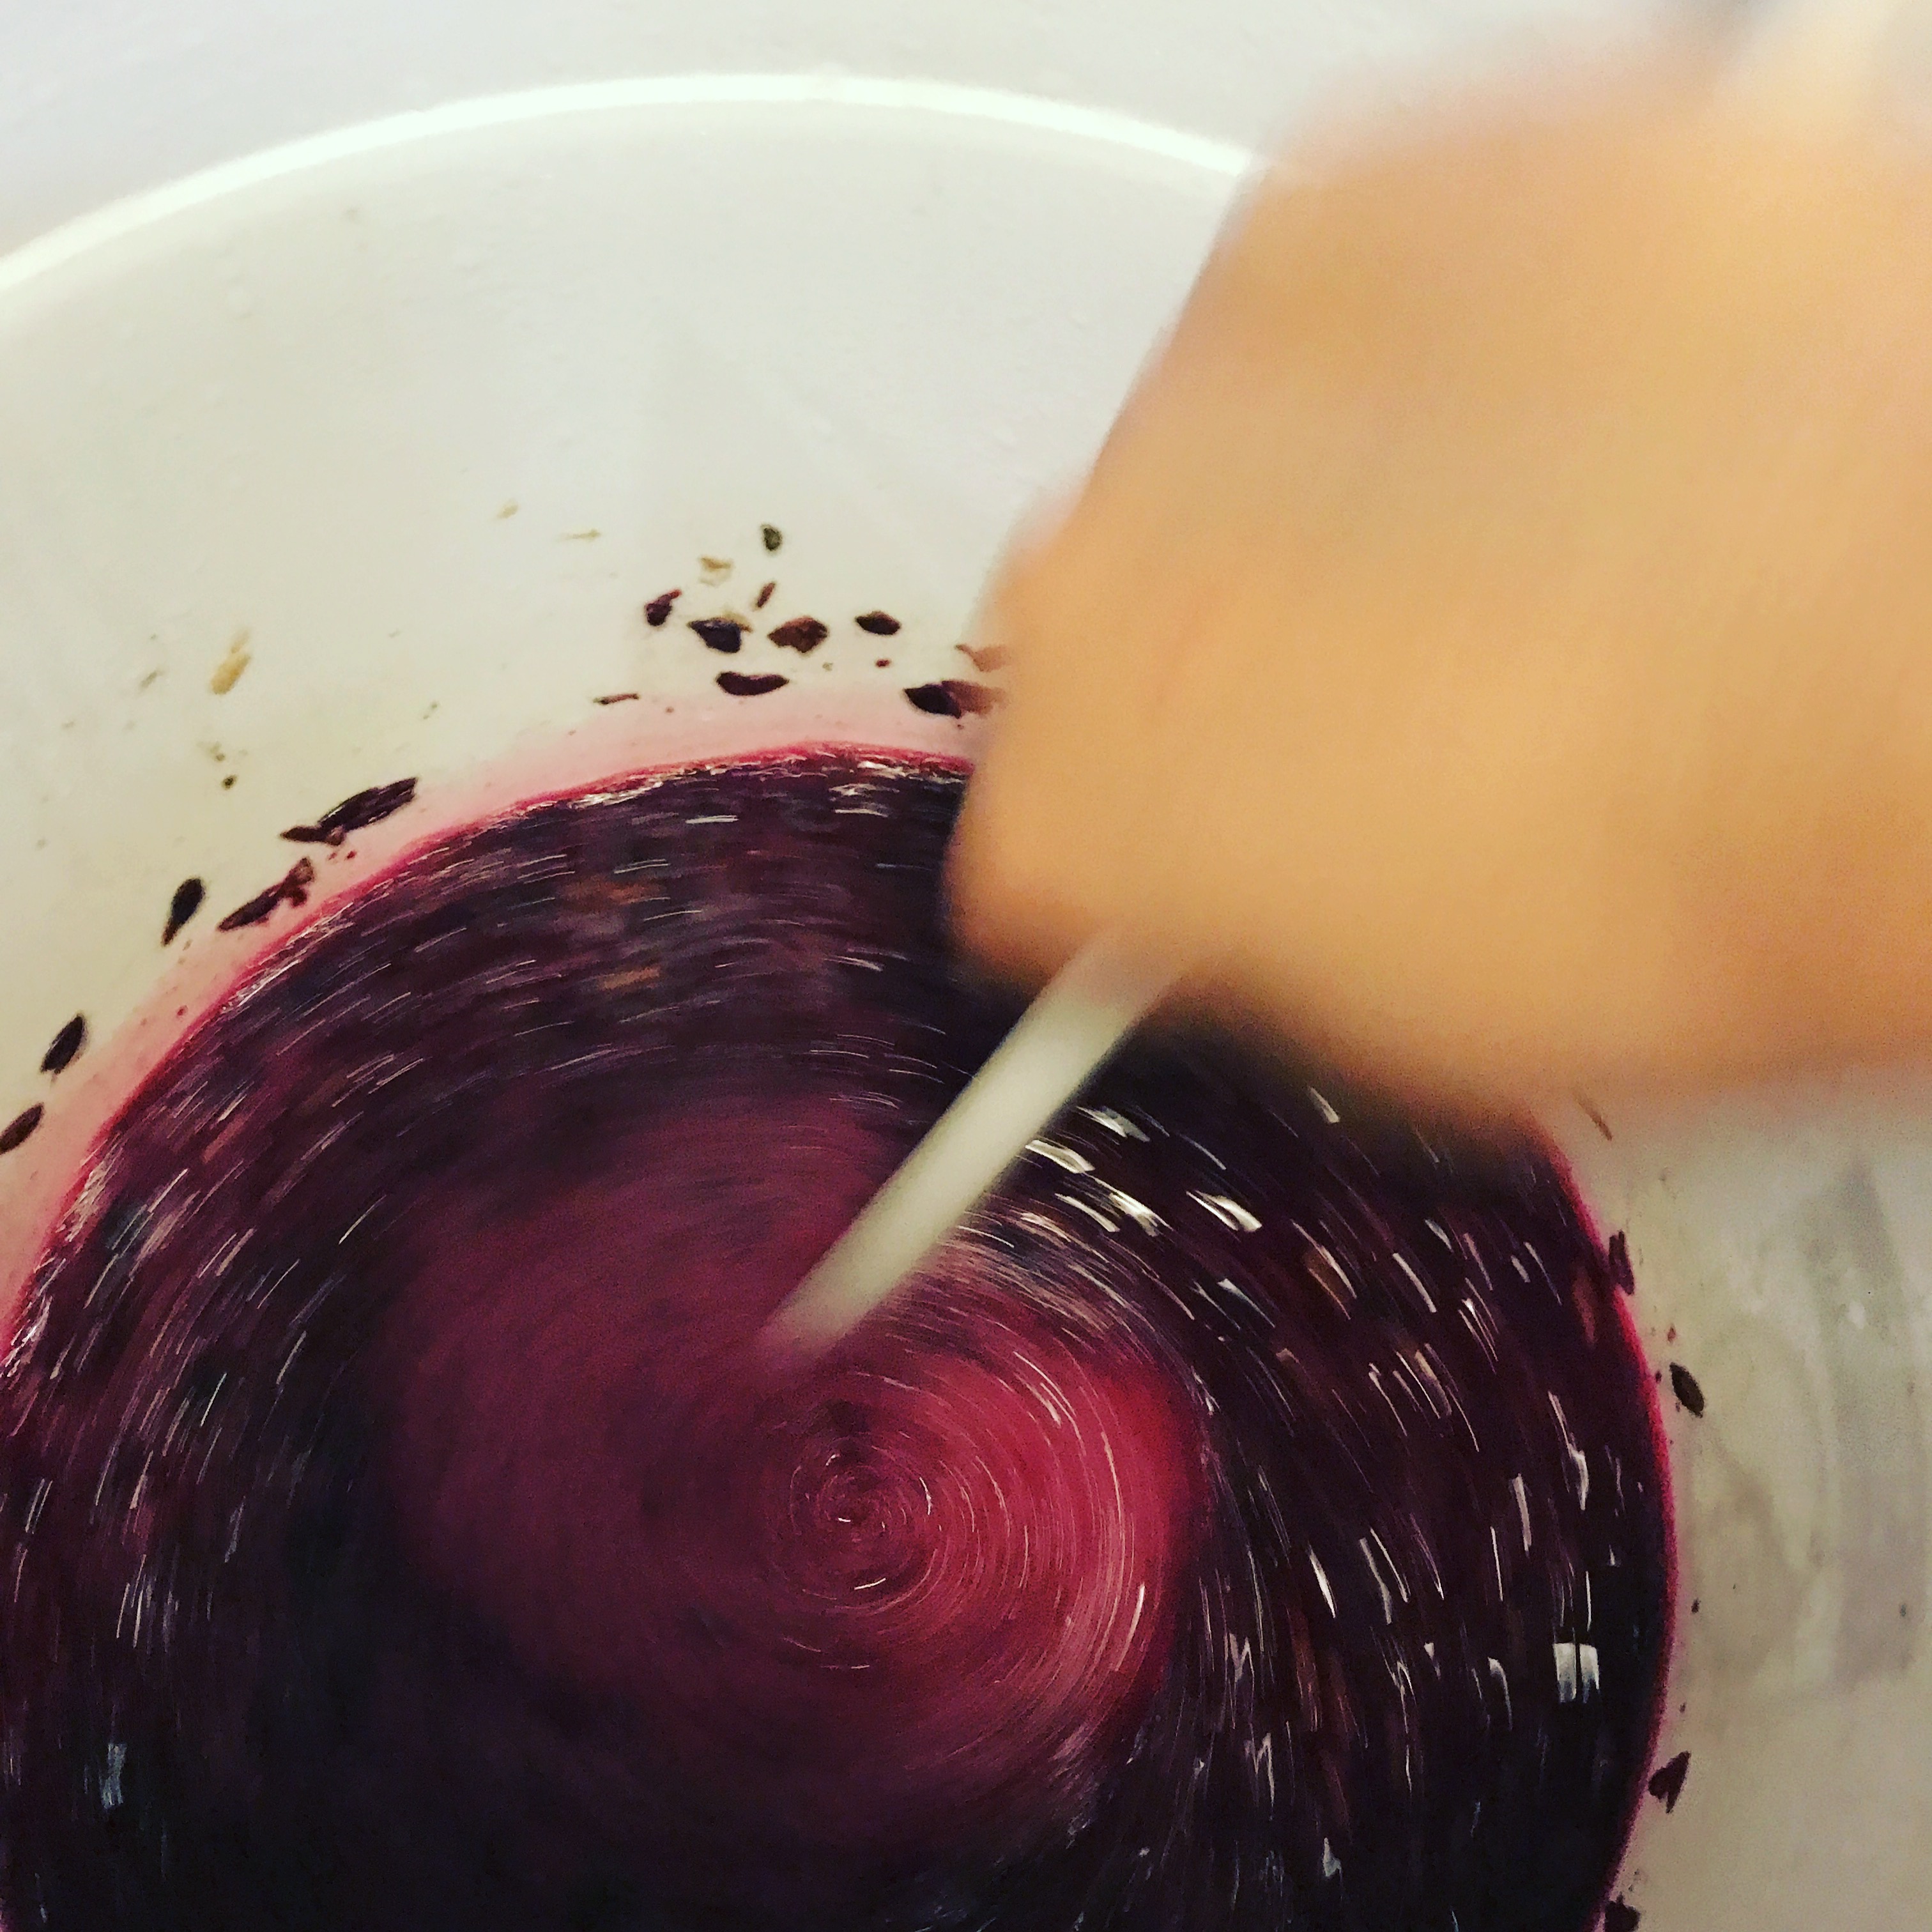
6. Stir- 12-24 hours later- check on it! Your juice should be starting to bubble. Take a large food grade spoon and stir. Make sure none of those grape skins stay on the side of the bucket. Make sure all skins are in the juice otherwise they could mold. This is a tricky stage where your juice isn’t wine yet and the Sodium Metabisulphite has all evaporated away. This is the time where your wine is most likely to get contaminated. Make sure everything that touches it is really clean.
- Stir again!-Stir your juice-wine twice a day. I know it seems like a pain to need to sterilize a spoon and pull open a huge bucket making sure the airlock doesn’t leak into your wine. But this part is actually the most fun next to actually getting to drink it. You get to feel the whole bucket heat up while all of your sugars slowly turn into alcohol. You get to see the grapes slowly separate from mushy grapey soup to seeds sinking to the bottom, skins floating to the top, and wine sitting in the middle. And the best part is the warm sweet smell it gives off when you check the bucket every day! Check the brix every couple days to make sure you’re on track. If you don’t see your wine start to bubble up within 48 hours it is probably too cold or you put it in an area where it isn’t warm enough. Adjust accordingly.
 8. Strain your grapes- After two weeks of stirring twice day separate your skins, seeds, and pulp from your juice with either a cheesecloth, or a food grade back designed for this. They are super cheap and you can use them 5-6 times before they get too gross to use again. 9. Long term fermenter- Put your juice in a glass carboy. The wine should go up to the neck of the bottle in order to make sure it’s exposed to as little oxygen as possible. Sometimes I add little glass beads to the bottle to raise or lower the level of wine.
10. Re-rack your wine. About a month after your wine goes into the carboy you’ll need to re-rack your wine. Re-racking your wine means taking off the top 98% of the wine off with a siphon and into your food grade bucket, and leaving the sludge debris of pulp and dead yeast at the bottom. 11. Then you compost your sludge, wash your your carboy, sterilize it, and then put the wine back in. The first re-rack is the most important. The purpose of every other re-racking from here is to try and get your wine to be clear. Obviously there are machines for this too, but us normies just re-rack our wine every 3 months or so. Make sure when you put your wine back into your carboy that it still goes up to the neck of the container so you don’t expose it to oxygen. You will probably need to put in a bunch of glass beads to make the level go up.
The long part is for suction so you don’t have to put your mouth to the siphoning tube. There will probably be at least an inch of sludge at the bottom of your container on the first re-rack.  12. Bottle!- After 3 re-racks and a whole year of waiting, you are probably excited to finally bottle your wine. I go to canva.com and I make personalized labels that I print out for my bottles. For this process you’ll need a bottler and of course bottles and corks. If your going to add sugar do so now. But remember, there will still be some active yeast in your wine so if you don’t add something to kill those yeast then your yeast will start fermenting them and your bottles will explode all over your newly painted basement. You’ll add Potassium Sorbate to stop this from happening. I usually don’t add sugar to my wine. In my experience, anyone who adds sugar to their wine does so because their wine sucks without it. I’m not saying my wine has never sucked. I’m saying I don’t put sugar in it when it does. What I usually do if it sucks but is still consumable is I wait until winter, and then for parties I put it in a crock pot with cinnamon sticks, ginger, orange slices, brandy, peppercorns, and some brown sugar and I turn it into a delicious wassle.
Put your carboy on a high counter and your bottles in a lower area. Then stick your sucking tool into the carboy and your long bottler into your first bottle of wine. Suck the wine into the siphoning tube and when you are ready, push down on the bottler. The black thing will push in and let the wine out at a controlled rate. When the wine is up to the neck of the bottle just simply pull up on the bottling tool and push down on the next bottle.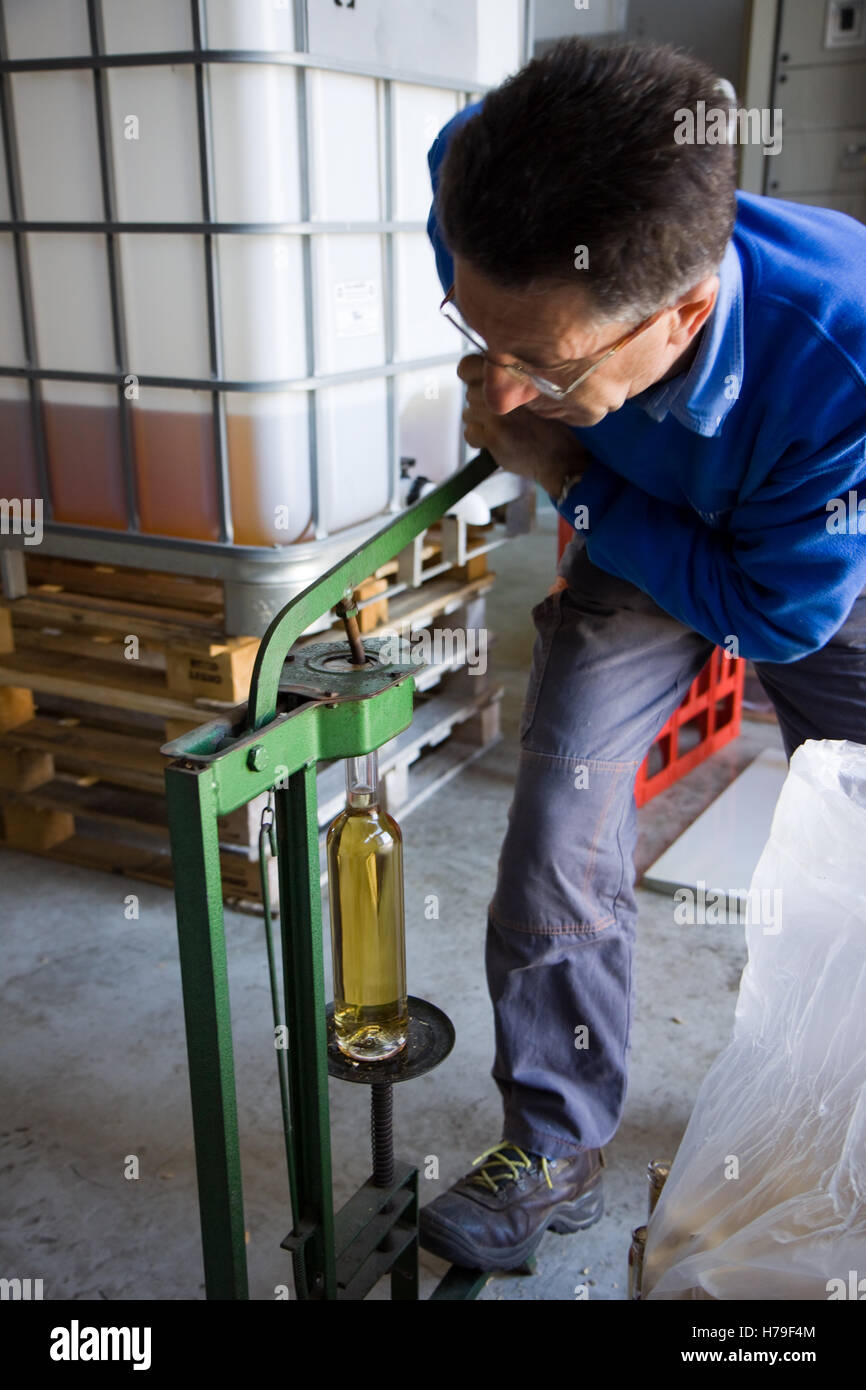
13. Cork it! Here is a picture of my boyfriend doing this (just kidding, it’s a shutterstock photo). After this, all you have to do is cork it and put on your labels! Don’t try your wine for at least a month after it has been bottled. Thanks to something called “bottle shock” it won’t taste right. Give it a month before letting family a friends try your wine.


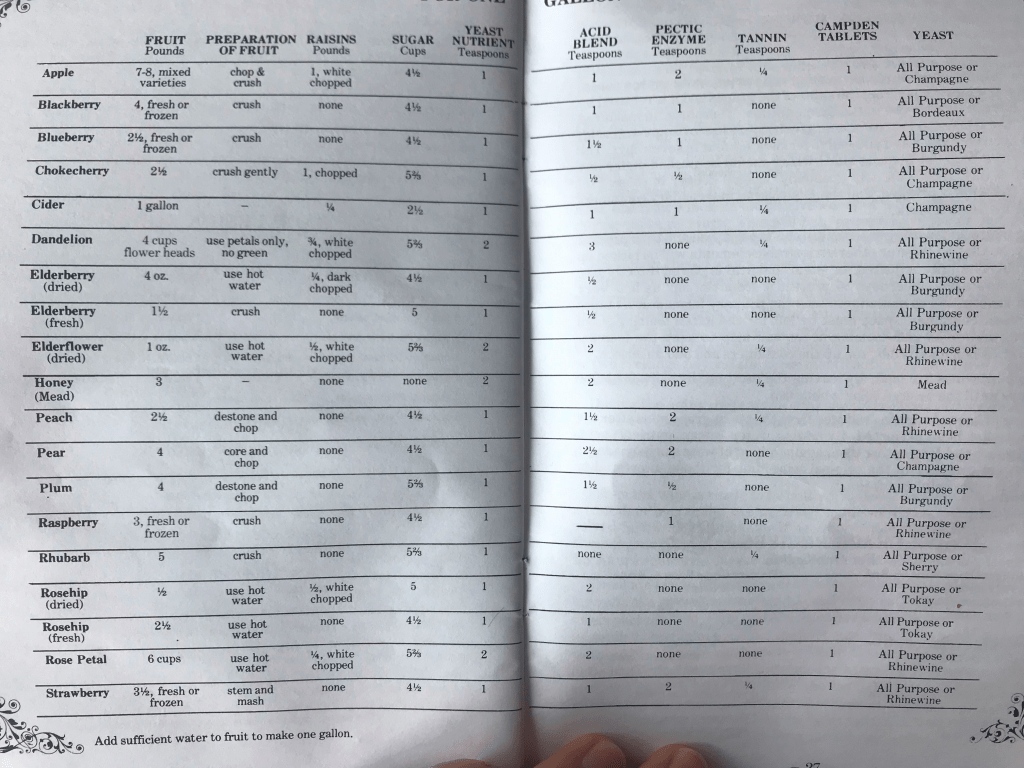
Here are a couple of the most important pages out of my wine book that I constantly use as reference when I stumble upon a new fruit I want to turn into wine! All the recipes I’ve tried here are stellar!